Get Started with your Canon Printer Setup, Canon Printer Download with ij.start.canon
Set Up and Get the most out of your Product here with Downloads, Online Manuals and More.
Manuals and Guides
Read Step-by-Step manuals with Driver Downloads and best-in-class support for Canon Printer Drivers or ij.start.canon/connect
Compatibility and usability
Access ij.start.canon Drivers and Software’s for
Getting Started
Quick Setup guide for your Canon Printer with ij.start.canon
Setting up Canon Printer or Scanner with ij.start.canon or ij.start.cannon is a very easy process and here are quick steps to set up your product model.
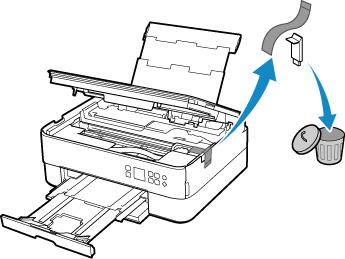
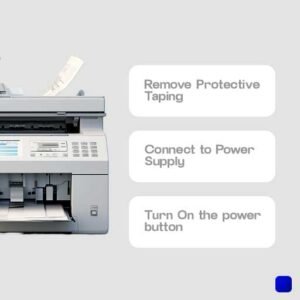
- Remove the Protective Taping:
A new printer or scanner comes with protective taping, identify the places your printer is taped for shipping and remove the taping.
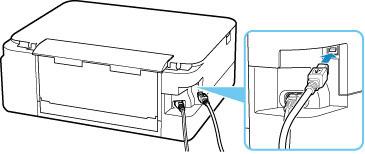
- Connect the printer Scanner to Power Supply:
Now, you will need to connect the printer to the included power supply cable. The Port is on the back of the printer.
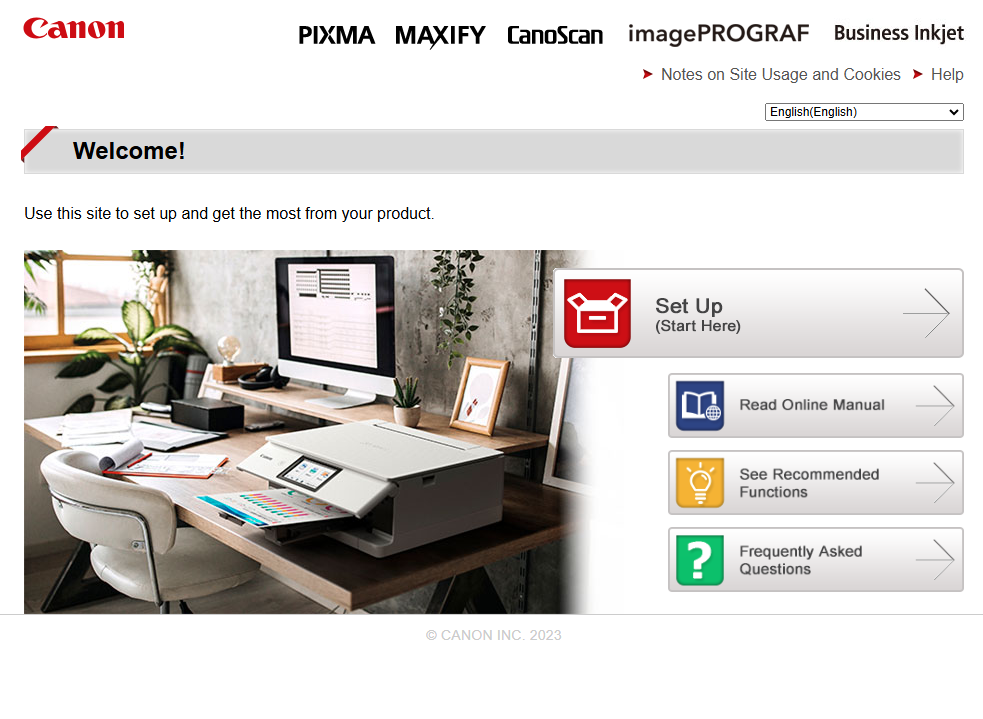
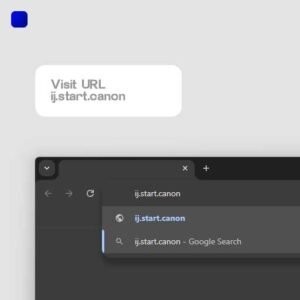
- Visit ij.start.cannon or ij.start.canon:
Open your favorite browser e.g. Chrome, Safari, or Edge, and type in the URL https://ij.start.canon or canon.com/ijsetup.
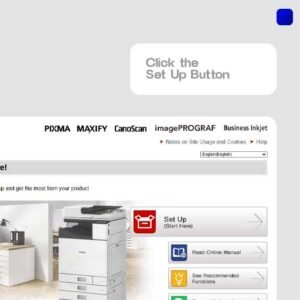
- Click Set Up button with Red Printer Icon:
Now click on the Set Up button with sub text “(Start Here)” and type in the printer/scanner model.
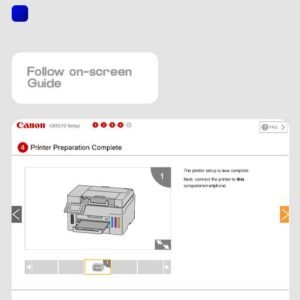
- Follow on-screen instructions:
On-Screen Instructions will simply show you the steps that you need to follow to download any software’s or drivers.
Note that ij.start.canon website automatically detects your location, region and your Operating System.
Plug-N-Play
Connect and Use your Printer/Scanner
Most New Printer or scanner models from Canon come as Plug-n-Play, meaning that there is no need to install drivers or any software to use these printers or scanners, all you need to do is Power On your Printer, and connect it to your device with WiFi or USB Cable, and you will get a prompt that automatically connects the printer and runs it on your device.
Multi-lingual
Access Guide in your language
You can now access our guides & manuals in all major languages.
Chrome
Extension for Chrome to Print
You can now download our Extension directly on your Chrome Browser from Chrome Extension Store.
Visit Chrome Extension Store & Enter “Printer Finder”
Know more about us
The importance of learning about online scams
In an age where cyber scams and tech support fraud are on the rise, protecting your devices and personal information has never been more important. We priorities safeguarding our premium subscribers from the growing threat of tech support fraud. We are not Canon INC nor affiliated with them, We are here to provide action against Tech Support Scams & Phishing.
IJ Scan Utility
Though there are inbuilt scanning applications available in almost all the systems. IJ Scan Utility, developed by Canon to make the process of scanning easy. It will allow you to connect the scanner with your System, Be it Mac or Windows, or Smartphones. You will easily be able to manage and Scan Files.
Apps Available for Mac and Windows
The Canon Print App is now available on the Windows App Store and Mac OS App Store.
Search Canon Print and Install it right away. It makes the process of setting up the printer and scanner much easier and faster.
Tips & Tricks
Setting up the printer or scanner, you might see blue tape that is required to be taken off from the printer or scanner. It helps secure the product after it is shipped and helps the product from breaking or falling off while shipping.
The instructions are also available on ij.start.canon or ij.start.cannon
WIRELESS Connection Guide
Easy Wireless Connect
Easy Wireless Connect is a program by Canon to setup and connect your Wireless printers and Scanners easily with just a few steps using the application on your Mac or Windows Computer.
How to Use Easy Wireless Connect:
1. Start Wireless Setup on Printer:
Press and hold the Wi-Fi or Wireless Connect button until the light blinks.
The printer enters Easy Wireless Connect mode.
2. Install the Canon App or Software:
On Windows/Mac: Download and install Canon IJ Start Utility from ij.start.cannon or ij.start.canon.
On iOS/Android: Install the Canon PRINT Inkjet/SELPHY app.
3. Connect to Wi-Fi:
Follow the on-screen instructions to select your Wi-Fi network and enter the password.
4. Complete Setup:
The printer connects to Wi-Fi, and you can start printing wirelessly.
Setup and installation
Takes about: 15 minutes
Install and Connect Canon Printer with ij.start.canon
In this step-by-step guide we will learn how to setup and install canon printer drivers from ij.start.canon with complete guide and instructions on connecting, installing and setting up your printer and testing your printer with test printer and scanning.
- Prepare your Printer/Scanner for Installation.
Before proceeding with the driver installation, ensure that your Canon printer is properly connected to your computer via USB cable or is connected to the same wireless network. Additionally, make sure your computer is connected to the internet for a smooth installation process.

- Open any Web Browser, Visit ij.start.canon or ij.start.cannon.
Open a web browser on your computer. You have various variations of the Page that can be visited, some are ij.start.canon, ij.start.canon/connect, https://ij.start.canon or Search Canon Printer Drivers on Google. All will lead to same website. However the easiest way to do it is by visiting ij.start.canon directly from your Browser.
- Click the Set Up Here button.
Once you are on the official Canon Manual Website, Click on the Set Up Here button on the right of the main page frame with a red icon.
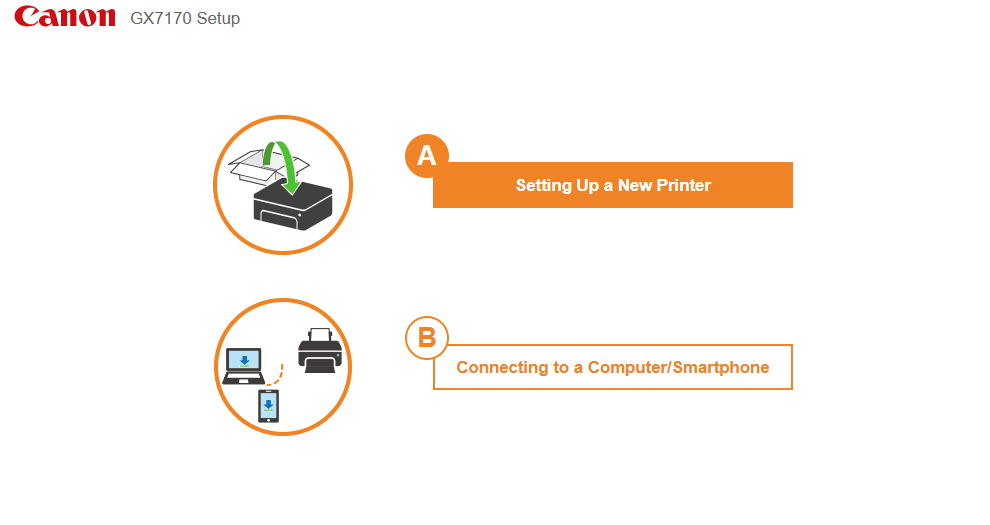
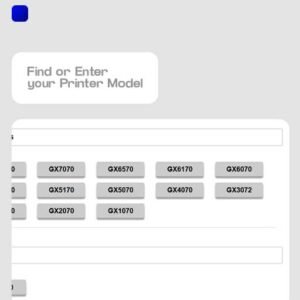
- Identify and Type Your Printer Model.
The next page will display a search bar where you can enter your printer’s model name. Begin typing the model name, and suggestions will appear. Select your specific printer model from the list that appears or you can select is from the list of Models Shown. Incase your Model number is not shown, you can select the region on the top left corner to access printers from your region.
- Once you select your Printer Model, Setup Guide will Start.
After you have selected your printer model, you will be able to see a guide that shows the steps on how you can connect your printer. Begin by pressing start and then follow on-screen instructions on how to setup a new printer. Follow each step with the visual guide shown on screen. Until you reach the driver download stage.
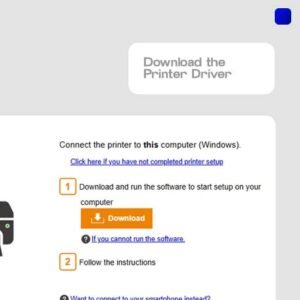
- Download the Printer Driver.
Once you’ve selected your printer model, you will be directed to the driver download page. Here, you will see a “Download” button or a similar option. Click on it to initiate the download process.
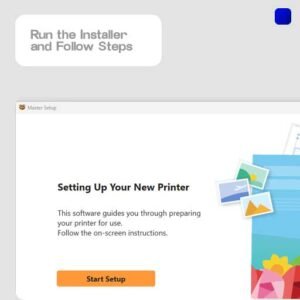
- Open and Run the Installer.
Locate the downloaded driver file on your computer (usually in the Downloads folder) and double-click on it to run the installer. Follow the on-screen instructions to proceed with the installation. The installer will guide you through the necessary steps, such as accepting the terms and conditions and choosing the installation location.
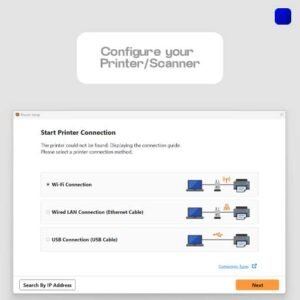
- Proceed with Connecting and Configuring your Printer/Scanner.
During the installation process, you may be prompted to connect your Canon printer to the computer via USB cable or set it up wirelessly. Follow the instructions provided by the installer to establish the connection.
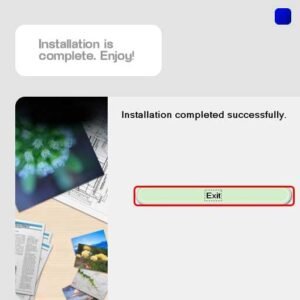
- Your Installation is Complete.
Once the installation is complete, the installer will notify you. At this point, you can choose to print a test page to ensure that the printer is functioning correctly. The installation process may also prompt you to register your printer or provide any additional configuration settings.
Linking the Canon Printer/Scanner with a Different WIFI Network
Firstly, turn on the printer and then using the printers display go to the settings. Click on the “Add new connection” or click the plus icon to add a new network. Select the network you want to connect to, and add the password. Follow on-screen instructions and allow the printer to connect to a new network.
If the printer does not have a display use a smartphone or computer.
Factory Set Passwords
For Default passwords that is set by the factory. The other way to find it is on the printers display.
For some printers the default password is 12345678 or the Serial Number.
You can also reset the password in the printer settings.
Fix and resolve
Troubleshoot your Printer
Encountering issues with your Canon printer driver can disrupt your printing tasks. Fortunately, there are common troubleshooting steps to resolve these problems and get your printer back to working smoothly.
- Check Compatibility: Ensure that the printer driver is compatible with your operating system. Verify that you have downloaded the correct driver version from the official Canon website.
- Restart the Printer and Computer: Sometimes, a simple restart can fix driver-related issues. Turn off both the printer and your computer, then power them back on after a few seconds.
- Update the Driver: Outdated drivers may cause problems. Visit the Canon website and check for the latest driver updates for your printer model. Download and install the updated driver.
- Run Printer Troubleshooter: Many operating systems have built-in printer troubleshooters. Use them to identify and automatically fix common driver-related issues.
- Reinstall the Driver: If updating the driver didn’t help, consider reinstalling it. First, uninstall the existing driver completely, and then install the latest version following the Canon setup process.
- Check Connectivity: Ensure that the printer is properly connected to your computer, either through a USB cable or over a network. A loose connection can lead to driver problems.
- Disable Security Software: Temporarily disable any security software (antivirus, firewall) that might interfere with the printer driver installation.
- Clear Print Queue: If print jobs are stuck in the queue, it might cause driver issues. Clear the print queue and try printing again.
- Verify Printer Settings: Double-check printer settings such as paper size, print quality, and paper type to ensure they match your print job requirements.
- Test with Another Computer: If possible, test the printer with a different computer. This can help determine if the issue is related to the printer or the specific computer.
AirPrint Guide for Mac Users
AirPrint is an inbuilt feature available on your Mac computers to connect your Printer without Cable using wireless functionality. You can simply follow these steps.
- Connect Printer to the Wifi.
- Add the printer in the Mac AirPrint Settings.
- Open the Document or Photo you want to print.
- Select the Printer that you have just added.
- Hit Print and wait for the printer to print the page for you.
Using AirPrint, Removes the need to download additional drivers.
quick copy
Copy or Duplicate using Canon Printers & Scanners
Effortless Duplications: Step-by-Step Copying with Canon Printers & Scanners
- Power on the Printer: Ensure that your Canon printer is powered on and ready to use.
- Place the Document: Open the printer’s scanner lid and position the document you want to copy face-down on the scanner glass. Make sure it is aligned according to any alignment guides or markers.
- Select Copy Function: On the printer’s control panel, locate the “Copy” or “Copy/Scan” button. Press it to access the copy function. Some printers may have a dedicated copy button, while others may require you to navigate through the menu options to find the copy function.
- Set Copy Options: Once in the copy mode, you may have the option to adjust settings such as the number of copies, paper size, copy quality, and color mode. Use the printer’s control panel or LCD display to make the desired adjustments. Refer to the printer’s user manual for specific instructions on navigating the copy settings.
- Start the Copy Process: After setting the copy options, press the “Start” or “Copy” button on the printer’s control panel to initiate the copying process. The printer will scan the document and produce a copy based on your selected settings.
- Retrieve the Copies: Once the copying process is complete, the printer will eject the copied documents into the output tray. Carefully collect the copies and ensure they are free from any smudges or imperfections.
Note: The steps outlined above provide a general guideline for copying using Canon printers. The specific buttons, options, and procedures may vary depending on your Canon printer model. For detailed instructions tailored to your specific printer model, please refer to the user manual or online documentation provided by Canon on ij.start.canon or https://ij.start.canon
First steps
Steps to Align Canon Printers
Ensuring Precise Prints: Step-by-Step Alignment with Canon Software
- Ensure that your Canon printer is connected to your computer and powered on.
- Install the Canon software: If you haven’t already installed the Canon software on your computer, insert the setup CD provided with the printer into your CD drive, or download the latest software and drivers from the Canon support website. Follow the on-screen prompts to install the software.
- Open the Canon software: Launch the Canon software on your computer. The specific software name may vary depending on your printer model, but it is typically called “Canon Printer Assistant” or “Canon Printer Utility.”
- Access Printer Maintenance: Within the Canon software, look for an option or tab related to printer maintenance or settings. It may be labeled as “Maintenance,” “Settings,” or “Tools.”
- Locate Alignment Option: In the maintenance or settings section, find the option for printer alignment. It might be called “Alignment,” “Align Print Head,” or something similar.
- Follow on-screen instructions: Click on the alignment option, and the Canon software will guide you through the alignment process step-by-step. Typically, you’ll be asked to load a sheet of plain paper into the printer and initiate the alignment process.
- Print Alignment Page: The Canon software will print an alignment page with patterns or lines. Make sure the printed page is placed face-down on the scanner glass or in the automatic document feeder (ADF), depending on your printer model.
- Scan Alignment Page: Follow the on-screen instructions to scan the alignment page using your Canon printer’s scanner. The software will analyze the scanned page and make necessary adjustments to align the print head.
- Alignment Complete: Once the alignment process is finished, the Canon software will display a confirmation message indicating that the alignment was successful. You can then close the Canon software.
Note: The specific steps and options may vary depending on your Canon printer model and the version of Canon software you are using. For detailed instructions, refer to the user manual or online documentation provided by Canon for your specific printer model.
Facing Problems? Here is a Solution!
There are a lot of people who are facing problems with Printer installation and support, We usually face problems because we miss simple steps. We will need to follow the instructions above precisely, and if you are looking for the driver, You can use the above form to find your driver and download the installation for that driver software, once you download and install the driver, the printer should be working fine on your device. Most of the latest Canon Printers, and the latest computer software’s should be plug-n-play. We are here to help you with ij.start.canon or https://ij.start.canon as has most curated and value based online guides for your printers.
Frequently Asked Questions
The Official Canon website is https://ij.start.canon, the domain that ends with .canon is the official site. All the other websites including our’s are 3rd Party websites for providing better content and Insights on ij.start.canon
Yes, With the latest operating systems paired with Latest Canon Printers or Devices, It is all Plug-n-Play in most cases.
ij.start.canon or ij.start.cannon is a website by Canon INC. that simply allows you to get specific guides related to the printer you are trying to connect.